File system tutorial
This tutorial gives a brief overview of the partial modeling and model generation features of the Refinery framework. It follows the development and analysis of a simple Refinery problem specification for modeling file systems. We adapted the case study from Chapter 1 of the Alloy tutorial.
Describing domain concepts
The Refinery partial modeling language supports metamodeling to describe desired structure of generated models. We may use classes and references to describe domain concepts similarly to object-oriented programming languages, such as C++ and Java.
class Filesystem {
    contains Dir[1] root
}

abstract class FSObject {
    container Dir parent opposite contents
}

class Dir extends FSObject {
    contains FSObject[] contents opposite parent
}

class File extends FSObject.

class Link extends FSObject {
    FSObject[1] target
}
Throughout this website, the Try in Refinery button will always denote an interactive example. If you click it now, it’ll take you to the Refinery web UI.
Metamodel constraints
Our specification not only lists the concepts (classes and relations) of the file system domain, but also prescribes a set of metamodel constraints concisely.
Metamodel constraints are often left implicit in programming. For example, the Java runtime environment will always prevent us from instantiating an abstract class.
However, in logical languages like Alloy, we have to specify most of these constraints manually.
While Refinery has a rigorous logical background, you’ll see that it still lets us define domains in high-level terms.
Some constraints are about possible instances of classes:
- The classes
Dir,File, andLinkare marked as subclasses ofFSObjectwith theextendskeyword. Instances of the classes must also be instances ofFSObject. - Conversely, the class
FSObjectis marked as an abstract class with theabstractkeyword. This means that any instance ofFSObjectmust also be an instance of one of its subclasses. - Classes that do not have a common superclass1 are disjoint, i.e., they can’t have any instances in common.
Other constraints are about references:
- References between classes must adhere to type constraints. For example, the source of a
parentrelationship must be anFSObjectinstance and its target must be aDirinstance. - There is an opposite constraint between
parentandcontents. Every occurrence of aparentrelationship must have acontentsrelationship in the other direction and vice versa. - All references must obey the corresponding multiplicity constrains:
- The notation
[]means that multiple outgoing references are allowed, i.e., aDirinstance may have 0 or morecontents. If we wanted to forbid emptyDirs, we could do so by writing[1..*]instead. - The notation
[1]means that there is exactly onerootfor aFilesystemortargetfor aLink. - If there is no specified multiplicity, such as in the case of
parent, 0 or 1 outgoing references are assumed. This closely matches most object-oriented programming languages, where a reference by default may benull.
- The notation
- The references
rootandcontentsare marked with the keywordcontainsas containment references that form a containment hierarchy:- Instances of classes that appear as the reference type of a containment reference, such as the instances of
FSObject(and its subclasses), must have an incoming containment relationship. - Conversely, the instances of
Filesystemare the roots of the containment hierarchy.
- Instances of classes that appear as the reference type of a containment reference, such as the instances of
Notice that we could use metamodel constraints to describe most of how our domain works. For example, we don’t have to further elaborate that a single file system has a single root directory and forms a tree, or that a link points to exactly one target.
You can read more about else what you can express with metamodel constraints by clicking on the links in the lists above. They’ll take you to the relevant parts of the Refinery language reference.
Model generation
Model generation automatically constructs possible instance models of your problem specification. You can use it to get examples for reasoning about a domain, candidate designs for an engineering problem, or test cases for data-driven software.
Before we can start generating models, we’ll need to specify the desired model size2. In this example, we’ll generate an instance which has between 10 and 20 nodes (objects) by using the following scope declaration:
scope node = 10..20.
You should click the button labeled Try in Refinery above to open this problem specification in Refinery.
Refinery web UI
Since you’ve just opened the user interface of Refinery, this is a great time to familiarize yourself with it! We annotated the following screenshot to show your the various parts of the interface.
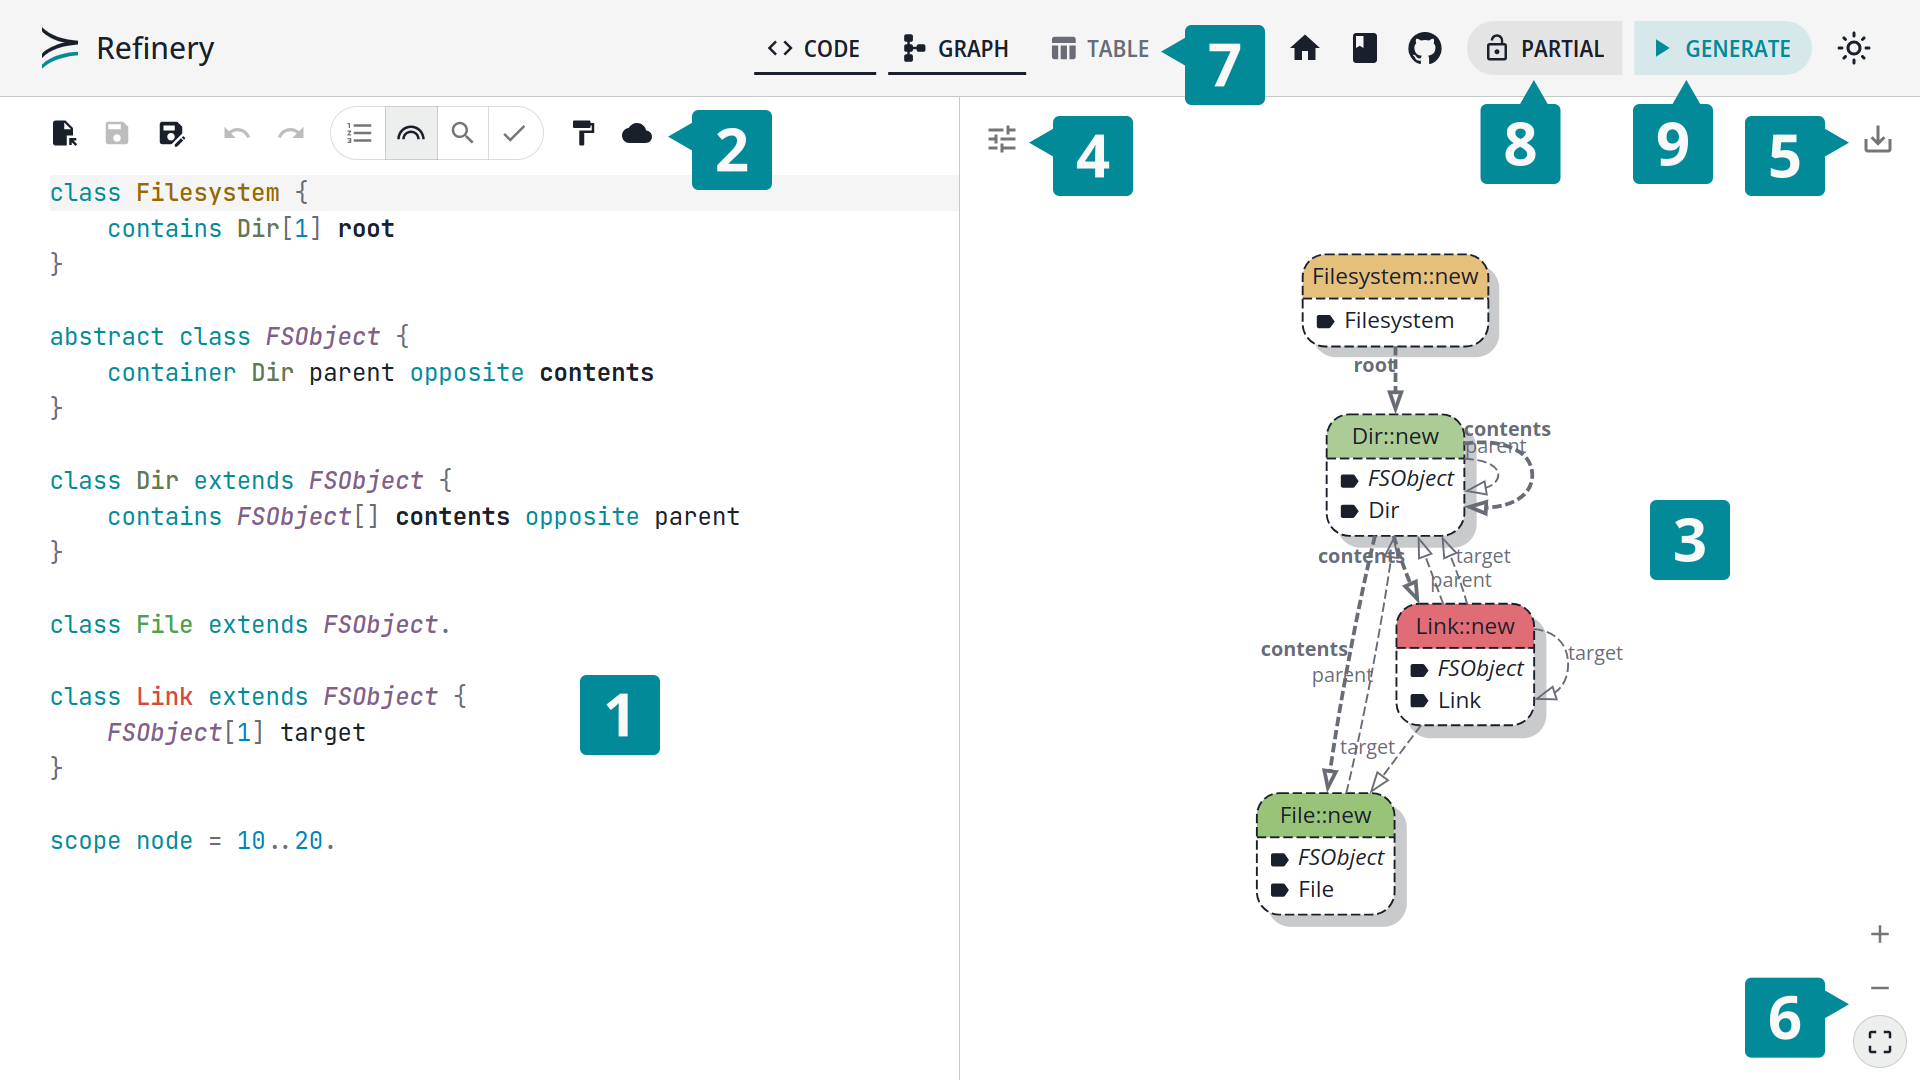
-
The code editor appears on the left side of the window by default. It lets you edit your problem specification, and provides common helper functions like auto-complete (content assist), syntax highlighting, syntax checking, and semantic validation.
-
The toolbar is located above the code editor, which includes buttons for common editing operations and settings.
Moreover, you can find the connection button here. If the button shows a disconnected state or an error, you should check your internet connection. Clicking the button will attempt to reconnect. Clicking the button again will disconnect from the server, but some code editing services and the model generator require an active connection3.
-
The graph view shows a visualization of your problem specification. The visualization of generated models will also appear here. We’ll discuss the notation used in the visualization later in this tutorial.
This view is continuously updated according to the contents of the code editor. If the update fails (e.g., due to syntax errors in your model or disconnecting from Refinery), the colors of the visualization are dimmed until the next successful update.
-
The filter panel lets you customize what should appear in the visualization. Click the button to open the panel.
-
The export panel lets you save the diagram as an SVG, PDF, or PNG file. Click the button to open the panel.
-
Zoom controls let you adjust the size of the visualization and make it automatically fit the screen.
-
The view selector lets you toggle the code, graph, and table views. You can have all three views open at the same time, or even just a single one to take a deeper look at the model.
-
The concretization button lets you switch between partial and concrete views of your model. Model generation always starts from the partial model, but switching concretization off can help you inspecting your model with closed-world semantics.
-
Finally, the generate button initiates model generation. You may only press this button of you problem specification is valid. Otherwise, it’ll jump to the validation errors in your specification in the code view. Pressing the button while model generation is running will cancel the generation.
Running the generator
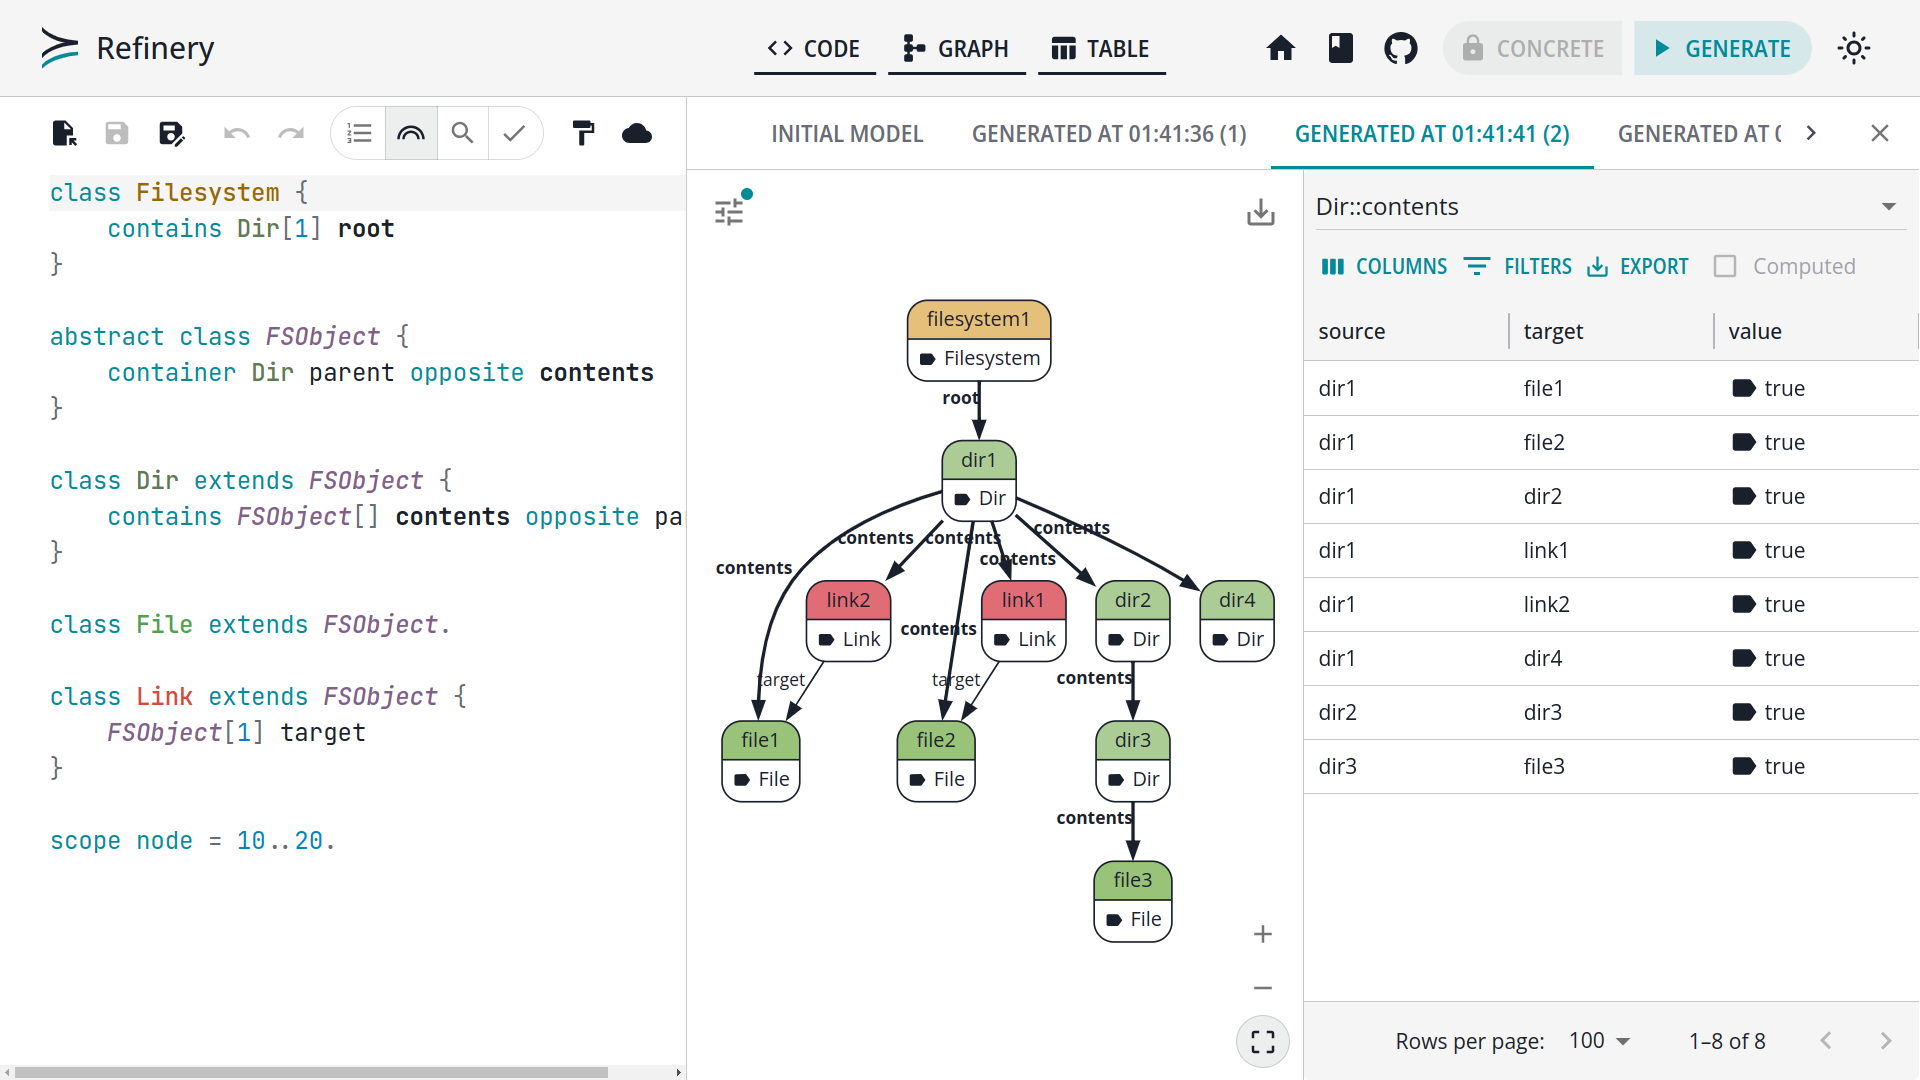
You can initiate model generation by clicking the generate button. It should return an instance model like this:
Take a moment to verify that this model indeed satisfies the metamodel constraints and contains between 10 and 20 nodes as we previously requested.
You can use the filter panel to simplify this visualization.
It is readily apparent from the metamodel constraints that all non-Filesystem nodes are FSObject instances, and the parent relationships always appear in opposite to the contents relationships. Thus, we can hide FSObject and parent from the visualization entirely without losing any information with the following filter settings:

We end up with the following visualization:
Clicking the generate button will yield different models by selecting a different random seed to control the model generator. This means that if you want to see multiple different instance models for your problem specification, you can just run the generation multiple times.
Generated models will appear as tabs in the Refinery web UI. You should also take the moment to explore the tabular representations of the generated model in the table view. You can remove generated models that you no longer need by clicking the close button.
At the end of this exercise, you should be looking at something like this in Refinery:
Partial models
This section of the tutorial is under construction.